
Experimentation
Planning Experimentation
Technique 1 - Level Blueprints -
The first planning technique that I researched in my research report was level structure and blueprints, in this research I identified two methods, one was a perspective 3D method that used 2D drawings and vanishing points to generate a 3D environment of a part of the games map and the second was to skip blueprints altogether and move straight into Unreal Engine. Now I stated in my research report that I did not agree with the last method, so for experimentation I will be comparing a normal top down approach to the 3D perspective approach from my report, in hopes that I can learn these methods in more detail and move forward with a method in planning and pre-production.
3D / Perspective Blueprint Method -
The first method that I identified from a credible book source relating to architecture in level design was to use 3D perspective drawings of an environment in my proposed level. I stated that this method would give a more immersive and in-depth view of my level and allow me to have a better view of perspective before moving into Unreal Engine and grey-boxing my level with the playable character, this would also allow me to see how I can utilise the architecture of my mall combined with the layout of my level. Below I have attached the experimental 3D blueprint for a rough idea of my level layout as it currently stands.
When practically experimenting with this technique I used a digital software called Procreate on ios, I opted for the digital route as I was able to use a grid style background in order to set-up the leading lines and vanishing points, and I could easily adjust or delete any drawings that I created on the blueprint. When experimenting with this technique, I felt that this was harder to carry out than other methods of blueprints, however, once I had set out my leading lines, the rest of the process was very smooth and came with no fault. I feel that this method gave effective results and has given me a different perspective on my proposed level than that of a traditional blueprint document.
Top Down Method -
The second method that I identified and have used before in previous projects is that of a traditional top down approach. I have previously used this method, however, I will be comparing this to the 3D approach of the previous method, to inform the type of blueprint that I will be continuing with for my project. This blueprint is also that of an early version of my current proposed concept and does not reflect that of the final version in game. Below I have attached the image of my level blueprint in the traditional top down format, I used Procreate again for this blueprint simply due to the ease of editing the blueprint after, to reflect changes in planning and the concept.
After experimenting with this traditional approach, I can see that this method is easier to plot and visualise a larger area of the map compared to that of the perspective method. In addition to this, when creating this blueprint I did not fall into the struggles of the first method, because I had previous knowledge of the method and also it is easier to create a flat 2D drawing than that of a perspective image. This method also allowed for annotations and more in-depth labelling when compared to the previous, I was able to plot doors and mission starters, this will be beneficial at planning my levels and missions in said levels.
In conclusion, when comparing the two methods I can see that they both adopt different approaches when it comes to planning the layout of the levels, for example in the perspective method I can only focus on a single section or environment, whereas in the 2D method I am able to map the entire level on a single page. This allows for an improved workflow as I will only be working on one document instead of many perspective drawings, in addition to this, as I stated above I am able to annotate and label my 2D blueprint, so this is an immediate improvement over the previous as I am able to plot different areas, objectives and objects on the 2D drawing. Going forward, I have decided that a mix of both perspective and 2D blueprints will be best tailored for my project as I will be able to plan a large overview of the entire level with the 2D blueprint and then zoom in on an important area of the level to give a clearer view in the perspective blueprint. This will allow me to plan the environments before I move to greyboxing so I will have a smoother production process, compared to if I do not plan my level structure.
Technique 2 - Storyboarding -
The next technique that I researched in tandem with level structure was storyboarding. Storyboarding is the practice of creating several strips or snapshots of scenes in the game's story and putting them into a digital drawing or analogue drawing. The storyboards allow me to detail the connections between scenes and highlight the key or important details of the story before I move into development in Unreal Engine, helping me to pace and structure my levels.
Storyboarding Method -
In my research report I identified that a storyboard includes the following: cards, that detail script, sketch of a scene or written description of a scene and then nodes, these nodes connect to the cards showing the line of progression between the scenes. This is a fairly basic overview of the content required in a storyboard and I will set out to replicate this workflow to create my own storyboard for this project, and evaluate whether this method is viable for my concept. In order to smooth the process, I used an online storyboard template, this was from Canva.
After experimenting with storyboarding, I feel that this was a very helpful tool at helping me to visualise and jot down the basic story as it currently stands. I was able to plot my story of the act structure and clearly define objectives and milestones that occur in the story, which will make it easier for me to plot these points within my game. In conclusion, I feel that this document will be helpful for my development and production stage, so going forward I will continue to update and amend this storyboard in order to track and plan my evolving concept.
Technique 3 - Scheduling & Project Management-
In my research report I researched and analysed scheduling and project management tools, I looked into Kanban Board and Gantt chart methods. In this report I will be practically experimenting with both of these methods of scheduling and will be weighing the pro’s and con’s of each method in order to come to an informed decision as to what method of project management I will be moving forward with for the rest of the project.
Kanban Method -
Following the research into project management tools, I identified the Kanban board as a viable piece of documentation that I can use for scheduling and tracking my project, unlike a Trello board that I have previously used, this piece of software is mainly used for project management instead of personal scheduling so by experimenting with this Kanban board method I will be able to compare this to my next technique of a gantt chart in order to better inform my project management going forward into this project. I identified that a Kanban board is often more agile than a gantt chart and this allows me to continuously update my project timeline over time, in addition to this, I learnt that this piece of software is laid out in a very similar manner to that of Trello, so I should be more than capable of creating my own Kanban board.
After experimenting with the Kanban Board method I can see that this method is extremely similar to that of Trello, and as I am wanting to be able to track deadlines and also allocated time on tasks I do not think that this method will be beneficial my project because I am unable to track timeframes and deadlines on a Kanban board. However, this piece of project management is very user friendly as I am able to filter labels for each process in the development cycle, allowing for a smoother search of tasks in each stage.
Gantt Chart Method -
Following research into scheduling and project management in my contextual research report, I have carried out experimentation into the Gantt Chart method that I found in a source referencing project management tools, because I want to understand this method in more detail and get a visual idea as to how this method would work for me in this project. As I found in this report, the Gantt chart is typically a horizontal bar chart that displays headings and timeframes for each task, for example you would position a header saying ‘Tasks to be completed’ and the underneath you would list all of the tasks required in the project and then the estimated time that would be spent on the task would be positioned to the right in the next set of cells. As I found in my research, a gantt chart is “an easy-to-follow plan that includes:How a project breaks down into tasks, When each task will begin and end, How long each task will take, Who’s assigned to each task, How tasks relate to and depend on each other, When important meetings, approvals, or deadlines need to happen, How work is progressing in a project, The full project schedule from start to finish”(TeamGantt, 2025). This allows me to track all aspects of the project and a tool such as this allows for continued amendments and updates as the tasks unfold, I believe that this method will be perfect for my project and the management of such a project.
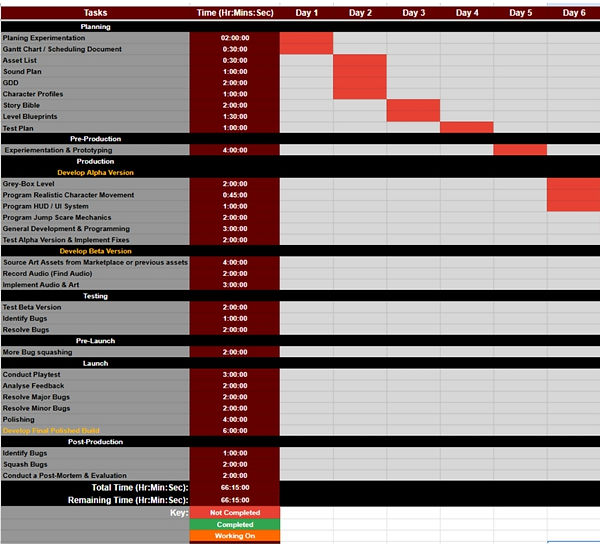
I will now experiment with a Gantt chart in Google Sheets in order to put my research into practice, in hopes that it will inform my project planning and management going forward. Below I have attached an image of my rough Gantt chart that I have created from the steps and advice that I identified in my research, as you can see I have identified the tasks in my project and identified clear milestones, timeframes and deadlines for each task. You can quite clearly see how I have broken down the tasks over the allotted time and to fit within the days that will be spent on the project, this helps me to keep track of my time and progression of the project.
Following experimentation into this project management and scheduling method identified in research, I can see that a Gantt chart is an extremely flexible and useful tool when it comes to plotting my tasks over the course of the timeframe and managing the time allocated on each task and milestone of the project. By experimenting with this Gantt chart I can see that this method gives an extremely clear colour coordinated view of the tasks and I believe that this is a more presentable method of displaying the required information for my project than that of the kanban board and also trello board that I have previously worked with.
After practically experimenting with each method, Kanban and Gantt chart, and comparing each method in detail I feel that a Gantt chart will be more beneficial as a scheduling document for this project because with this method I am able to plot timeframes and easily see the remaining and completed time on the project tasks, unlike the Kanban that would not allow for time management or the outline of timeframes and deadlines. In addition to this, a gantt chart is a more useful tool for me because the colour stages and visual nature of the plotting of the tasks gives a better view for me to be able to track tasks that have either been completed, need completing or are in process, this is more beneficial than that of the Kanban because on that software I had to scroll through the list of tasks to identify which I had completed or not, unlike the gantt chart that can be clearly seen on one page. So after weighing up the practical methods of planning I have come to the conclusion that I will be moving forward with the Gantt chart for this project because I feel that this gives me a clearer overview of the project and its tasks as a whole than that of the Kanban board.


Planning
Experimentation -
practical experimentation
Realistic First Person Camera:
The first technique that I will be experimenting with is realistic movement and camera for the first person character, a technique that helps me to improve the immersion and movement of the player in the game as they control the main character. In addition to this, in my contextual report I researched into the two methods that I would like to experiment with and came to the conclusion that these methods both presented viable options for this technique and both provided high quality outcomes.
-
Camera Boom Approach - James The UE Dev: https://www.youtube.com/watch?v=jkPxVScULh4
Following the research report, the first method that I will be experimenting with was provided by James The UE dev, they explained that in order to achieve the technique that I am aiming for, I must remove the camera from the character blueprint and instead use a camera boom with pawn control enabled. I will now experiment with this technique and detail my findings and development below in order to come to a conclusion as to what method I will be following through with.
https://www.youtube.com/watch?v=sIsJl_Edo5s
After experimenting with the first technique presented by James in the Contextual report, I found that this method approach to the first person camera technique was extremely effective and easy to set up resulting in a very immersive camera experience when playing the first person character. In addition to this, the method was extremely foolproof and I ran into no issues when implementing the technique into my Unreal Engine project, this was to be expected as the technique was presented in a very in depth manner. This method works extremely well at portraying the immersive camera and movement that I wanted to adopt in this project, however, I will need to experiment with my next method before I come to any conclusions as to what method I would like to adopt in the builds of my game.
2. Legacy Camera Shake Approach - Eremental Studios: https://www.youtube.com/watch?v=o1g22erv-2Y
The second method approach to this technique of achieving a realistic camera movement, I researched into a technique in my contextual research report that adopted a new approach to the technique that differed from that of James, this method was presented by Eremental Studios on YouTube. This second method uses a completely different approach than that of James, they choose to set up the camera bobbing manually using Legacy Camera Shake blueprints that are called whenever the correct velocity is being outputted by the character. This in theory results in more personalised camera movement compared to James method and by experimenting with this method I will be able to compare and contrast both methods in order to make an informed decision as to whether I will be adopting this method or the previous.
https://www.youtube.com/watch?v=5CiJ84nquRg
After extensively experimenting with this second method that I found in my contextual report, at first I found this method to be more in-depth and creative than the previous method. I was able to customise the strength of each head bob on idle,walking and sprinting, however, when putting this into practice I found that the head bobbing looked very unrealistic and exaggerated, resulting in a harsh experience for the player. In addition to this, the method presented extremely useful practical techniques in Unreal however, when the experience and head bobs were put together it resulted in a scrambled mess, the characters head would move excessively and did not reflect that of a realistic human when compared to James method of using a camera boom. Overall this method was extremely underwhelming and the results did not reflect the quality that I was hoping for; thus I will not be continuing this method as my main method when it comes to development.
When evaluating both methods of approach to a realistic first person camera, I found that James' method was more successful and close to the results that I am aiming for, for this project, this was because the camera movement was subtle and reflected that of true head movement. When looking at the next method, the head movement was extremely aggressive and did not reflect that of real life and so this method will not be carried over to my project, in addition to this, this method was not considered as a chose because I was unable to use a third person character for this method, meaning that when the player looks down they can not see their body or feet, this is something that I wanted and Jame’s method caters for. When it comes to what method I will be carrying over to my development, I will be solely adopting the camera boom method presented by James and this is because of all of the reasons that I have presented, however, one area that Jame’s lacks in is idle head movement, so for this reason I will be taking the idle camera shake from Eremental Studios and combining this with the method presented by James, this way I will be able to use a realistic walking camera movement and also idle movement.
Jump Scares in Unreal Engine:
The second technique that I identified in my Contextual Report to be an area of experimentation for my horror FMP project was the implementation of jump scares, as I am planning on developing a horror experience as my FMP Project I wanted to research and experiment with methods of jump scares some of which I identified in my contextual report and similar narratives. Both of the methods that I will be experimenting with adopt different methods of achieving varying jump scares, the first will be created using physics based movement in order to create an object jump scare and the second will be a more traditional method of a jump scare, using a character to jump out on the player. I will now experiment with both techniques in order to come to an understanding as to what method I would like to continue to use in the future of development of this project.
-
Physics Based Jumpscare - Ugur Batar:
https://www.youtube.com/watch?v=t5wPkLe-BdE
The first method that I identified in my Contextual Research Report was that of Ugur Batar, this method adopts a non-traditional approach to implementing jumpscares, this method relies solely on a collision box and an object that can have physics and force applied to it, as well as sound effects. When I first started to research jump scares I wanted to adopt a more unique approach to these methods and so this technique stood out to me as a method that I would like to experiment with and hopefully adopt going into development based upon the evaluation of the practical application of this method. This method uses collision boxes and physics in order to move a book or object off of a surface in order to incite a scare, this is also paired with a sound effect, however, as I will be carrying out further experimentation into audio in Unreal Engine I will not be adding audio to this experiment.
https://www.youtube.com/watch?v=1DE_1W89i48
After experimenting with the first technique, I found that this method was easy to replicate and will be extremely useful when it comes to implementing a jumpscare into my project, the jumpscare is very customisable and will allow me to amend and tailor the jumpscare to the area of the map, as well as ensuring that I can easily replicate the jumpscare wherever I please. This method was very easy to put into practice and the results from the practical technique fit well with my expectations, I believe that this technique method will be suitable for my game
-
Animation - Level Sequence Experimentation - Ugur Batar:
https://www.youtube.com/watch?v=kfDW98xRFKw
The second method to this technique was in fact extremely difficult to put into practice, considering the fact that I have no previous experience in animation and also the level sequence used within the tutorial. Overall, this technique looks to be really well put together and in terms of the flexibility of the technique, this can be customised to suit different areas of my game as well as environments if executed correctly. Unlike the first technique, this one uses level sequences to play a simple walking and attack animation that triggers when the player interacts with a collision box.
https://www.youtube.com/watch?v=8_Vz8xUqpww&list=PLlA4zxjr2rnjJ0FJFlVwyLxZhPCWYRQJW&index=7
After experimenting with this feature / technique I was unable to successfully implement this and make it function correctly, without the need for extended experimentation which I cannot allow for, especially as I want to ensure that I stick to my planned time frame. As you can see in the video attached above I was able to get to the point of using a level sequence, however, after this the sequence did not load correctly like in the video. I looked back over the video multiple times however, I was unable to resolve the issue and get the feature to function correctly and as intended. So with this I will not be carrying forward this technique into my game instead I will be adopting the first technique because this functions correctly and also this will be satisfactory for my game.
In conclusion, when comparing both techniques, I feel that the first technique will be more beneficial to my project because the sheer unexpectedness of this jump scare will be more compelling than a traditional predictable jumpscare. In addition to this, when it comes to the implementation of these traditional jumpscares I can use my already built AI sight system, so the loss of the second technique is not a large impact on my project outcome and instead this technique will be an improvement.
HUD - Objective Tracker:
The final technique that I want to experiment with following research in my contextual report is a technique that allows me to track and display current objectives or missions on the players HUD, this will help to give guidance to the player as they will be able to see what objectives they need to achieve in order to progress through the level. I have identified two methods to achieve this technique and each method presents a different approach to a similar outcome, by experimenting with both I will be able to identify what method will be appropriate for my outcome and project. The first method that I will be experimenting with is a method presented by Matt Aspland, a YouTuber that I have used in the past for experimentation and research as their tutorials are always clear and easy to follow.
-
Canvas / Widget HUD - Matt Aspland: https://www.youtube.com/watch?v=g26Iri4RDsE
The first method approach to this technique I found in my contextual report and focused on using collision boxes as well as variables and widgets in order to track and present objectives to the player on the HUD screen. When researching into methods on this technique I wanted to identify and experiment with methods that allowed for the player to visualise and track their objectives by referring to a constant on-screen list, I managed to identify two methods for this and I feel that this first technique allows for a more creative and customised approach, that in the provided tutorials looked to be extremely user friendly.
https://www.youtube.com/watch?v=B_YqcZjd3ug
After experimenting with the first method approach to this technique I found that this method was in fact very customisable, I was able to move the text on the widget to my desired position and edit the font colour and size yet again to fit my specifications. In addition to this, I was able to seamlessly add my Objective Tracker over my existing HUD, so this helped me to identify the limitations of this method and so far I am happy with the fact that it can work over existing designs that I have implemented into the game. Furthermore, the system is flawless and I can easily add more objectives into the level without the need to duplicate or amend any code, meaning that I have the ability to amend the objectives as I please without the worry of the code not working properly. So far I feel that this method will work perfectly with my outcome, however, I will now experiment with the final method and then compare the two to come to an ultimate verdict as to whether I will be following through with this method or the next.
-
Functions and Variables - Gorka Games:
https://www.youtube.com/watch?v=ft8mUfN35XU
The next method that I identified in my report was presented by Gorka Games on YouTube, this method is similar to that of the previous however, this method relies more on functions instead of constant updates to variables. This method seems to be more technical than that of the previous method and so I may run into a few issues when implementing this method, because I have rarely used functions in Unreal Engine before. The look of this method is extremely close to the previous in terms of how the objectives are presented to the player. I will now experiment with this method and compare it to the previous in order to evaluate both and decide what method I will be continuing with going forward into production.
https://www.youtube.com/watch?v=aq4ZqN_VyR4
After experimenting with this final method in Unreal Engine and comparing it to the first method, I can see that this method was a more technical approach to the same outcome and the use of variables and functions complicates an otherwise easy feature, and so for this reason I do not feel that this method will be suitable for my outcome. Comparing the two methods, I can not see a difference between the two outcomes, in terms of how they act and look onscreen, however when looking deeper into the code and functionality of both methods, the final method presents an overly complex system for presenting objectives to the player.
In conclusion, after completing both methods and evaluating their functionality I have come to an informed conclusion that I will not be carrying forward the second method to production, this is due to the fact that this method is fairly complex when compared to the first. In addition to this, I have also chosen to carry the first method into production because the variable system that is utilised in the widget blueprint is far easier to update and amend over the course of development when compared to changing and editing functions, I will now implement the first method of the HUD objective tracker to my project.
Audio and SFX in Unreal Engine:
The next technique that I identified in my Contextual research report was the use of audio and SFX in Unreal Engine, I identified this as a technique that I wanted to experiment with and subsequently implement into my project because I found through my similar narratives that most horror games use a soundscape in order to elevate and enhance the immersion and horror experience, so I need to experiment with this technique in order to understand how to use it effectively. Both of the methods to this technique present varying approaches to implementing and utilising sound effects in Unreal Engine and the audio can be used in different ways in the gameplay, for example my methods are solely used for footsteps within the characters animation, but the theory can be applied elsewhere within my project.
-
Free Unreal Engine 5 Tutorials UE5 - Adding Footsteps - https://www.youtube.com/watch?v=926-NU-QF2M
-
Epic Games Forum - https://forums.unrealengine.com/t/how-do-i-add-footsteps-sounds-to-my-character-in-this-specific-scenario/479352/10
For this experimentation I have decided to combine the two sources and evaluate them together because the theories displayed by both do not vary a lot and so therefore it would make sense to evaluate both methods at once. Both methods explain that in order to import the audio I drag and drop the files over to my content drawer and then create a cue for each audio file, however, the first source told me to use one single audio file instead of the five in the second tutorial. After this I attach the cue to the walking animation at the exact time the character steps or feet touches the floor.
https://youtu.be/IWcX3NF4bRw?si=47yob1jxB3L9BD9b
After experimenting with both sources I can see that both methods present me with the knowledge needed in order to not only add footstep sounds but to also add other audio cues for enemy hits or opening doors that I have planned. The experimentation ran without any issue thanks to the easy tutorial and also extensive research that I carried out prior. When evaluating the two sources I can see that both of them follow the same theories and work practices, however, the second source uses a random feature that mixes five different footstep sounds in order to mix up the audio heard within the game, this is a really cool feature, however, at this stage I do not feel that this will be useful in my project as the footsteps will be of low volume and are not the main focus of my job role going into production.
In conclusion, I will be adopting the simple single audio file technique when it comes to implementing audio into my game because I feel that this will be sufficient enough for my outcome as the main focus of the game is obviously the level design and also programming.
Practical
Experimentation -
Extended Research & Experimentation
Key and Door Mechanic
During production I have encountered the need for extended research and experimentation, this extended research will allow me to develop my concept further and to also show that I am constantly updating my work practices in order to achieve my project outcome. During production and specifically the process of trying to implement a key and door mechanic I have run into an issue, this issue being that my previously taught method of using this system will not work fully with my concept approach to this mechanic, so in order to learn a more efficient and effective method of carrying out this mechanic I will carry out research into this method.
After searching on the internet for tutorials for implementing an efficient method of a key and door system I have been successful in finding an effective method for this, I was able to source a YouTube tutorial on this mechanic and I will evaluate this method below. The tutorial opens with an overview of the mechanic in full working order and by the presented outcome I can already see that this method allows for more flexibility and customisation than that of my previously learned method that I adopted back in the maze project. The outcome allows for multiple doors and keys that can be assigned to one another, so only a specific key can open the matching door that was assigned to it using the eyedropper tool.
The first steps within this tutorial are to create two blueprint interface systems, these blueprint interfaces will hold the information required to pick up a key and also interact with a door once the key is in hand, this allows for a smoother execution instead of using code for each door and key, I can use a single function for each interaction with both the keys and doors. The next step is to set up a key binding within the third person character blueprint to allow for the calling of the interact function, this is achieved by linking a key binding to a for each loop node that will trigger every time the key is pressed and will loop the interaction so that it can be played again. This is extremely important to be paired with an overlapping actor and branch node within the blueprint as the code will only fire if the character is overlapping the correct actor within the world and will only trigger once on overlap instead of looping the pickup and also interaction with the door. They explain that this code is now complete and means that I can interact with anything with my level such as the keys and doors when they are implemented into the game world.
The next steps outlined are extremely similar to that which I had used in the past and this is to set up two actors within my world, one being the key item that will be accompanied by a box collision, in order to trigger the presence of the player and interaction, and also a door actor that will also be accompanied by a box collision for the same purpose. When setting up the key, the tutorial states that I need to edit the class settings of the key object and assign the blueprint interface to the key in inherited interfaces, this will ensure that I can pick up and interact with the key in the game world. After this the tutorial states that I should create a series of variables within the key actor in order to reference the pick up of the key and also to reference the appropriate door for the key within the level, this variable is then changed to an object reference of the same name of the door, this way I can customise the keys to each door without having to manually code each. After this I grab a reference to the newly created door variable and attach it to the interaction interface that I created earlier, and then attached the second pick up key interface that I created in order to collect the key, after this, I create a line of code to destroy the actor upon pickup, by using the similarly named destroy actor node.
We then carry out the same steps for the door except that I add both interfaces to this blueprint instead of just the interaction interface, this is essential in allowing me to register that a key has been collected and the door can function correctly. We then create a boolean variable called has key, this is then set to true once the event pickup has been fired, this is the line of code that we created on the key blueprint a moment ago. After this we go from the interact function and add a branch and flip flop node, with the A on the flip flop linking to the opening of the door through a timeline feature and B being the closing of the door. We then create a timeline of how long the door will take to open as well as changing the rotation of the door to open in the correct way. Then reference the door that needs to be rotated and create a lerp function that shows the rotation required that we set up in the timeline. This is the final step in the process of implementing this feature and I will now experiment with this and implement this into my game.
In conclusion, this method is more effective and efficient when compared to my previous method and this is because for my previous method I had to manually reference each key and door, however, for this I only need to change the object reference for each key and door instead of having to duplicate the code. Overall, this method will be more beneficial for my project and so I will implement this new mechanic into my game in order to smooth development and improve my working practice.
Packaging my Unreal Engine Project / SDK Error Message
One key area that I felt I needed to research into was how to package and distribute my game, as I have no previous experience in this and I know problems and errors could delay ahead in terms of packaging my project research into how to will greatly help me going into the launch phase.
In my search for an in-depth tutorial on how to package my game I came across a YouTube video by the most trustworthy person I use for Unreal Engine tutorials, Matt Aspland, now I have been using his tutorials since the beginning of the course and his tutorials are always straightforward and easy to follow along with. Matt highlights that in this tutorial he will be looking at a smooth and optimised package approach to an Unreal project and I feel that by this he means that we will only be packaging the required assets and levels with the game to reduce the file size of the packaged game.
The first major step in this tutorial is to create the game, now I am well within development of my final build so this is not an issue for me and I will be packaging both my Alpha and Beta versions at this stage, with the final version to come after I have finished development. The first step is to open project settings and locate the maps and modes sub section, in this section I will specify what level will open first when the extracted app is opened, in my case this will be the Mall of the dead ALPHA and also Mall of the dead Beta, for both my alpha and beta versions, he explains that this is necessary to ensure that the correct map is opened when the game is loaded and to ensure that we reduce the filesize of the application.
After this we then navigate to the packaging sub section of the project settings page and change a few information points within this settings page, the first being, changing the Build Configuration from development to shipping, this ensures that no debug menus are present in the extracted game file. In addition to this, we select the for distribution tick box, in order to tell the engine that the build is for distribution and not further development. After all of these steps, I then prepare the game for the intended release device, so in my case this will be Windows, going back to the main development screen I click on the package content button and use the shipping setting.
After watching this video, I feel that I am more than capable of packaging my game ready for distribution on itch or Google Drive. This video has taught me the knowledge needed to be able to carry this out and I will now try these steps to package my game and hope that no faults arise.
Extension: SDK Error
After carrying out the steps in the video I was met with an error message after going through 30 minutes of packaging, this error read SDK Not Setup, not being very technically minded in the programming of Unreal Engine, I have no clue as to what has caused this error and have no idea of fixing this issue either. So I will Google this error and look through the Unreal Engine forums to find a solution.
As predicted I would not have been able to fix this issue by myself and thanks to a forum page that linked to a quick YouTube tutorial I am now able to resolve this issue. The first step is to install the latest Microsoft SDK version from Microsoft Developer and to also install Visual Studio also from Microsoft as these programs do not come standard on my PC. After installing these programs I restarted my Unreal Engine and PC and executed the package again, this time the error did not occur and I was able to package both my Alpha and Beta builds successfully.
Melee Combat:
Another area of research for this project was the implementation of Melee combat, now this was an area that I was considering for most of this project but I finally settled on this idea one week into production when I found that the game was lacking in depth and mechanics. So in order to understand the mechanic and implement it in a professional and correct manner I am carrying out extended research into this mechanic in order to elevate the combat in the game, this will apply to both AI attacks and also player combat.
After searching the internet and more specifically YouTube I have been able to source two videos that relate to melee combat for both AI and player, and in this report I will experiment with these mechanics and implement my practical workings into my project. These videos are very lengthy to summarise in a written report, especially with the time that this is taking from production, so in summary I will explain the brief workings of the melee combat mechanic and how it works in Unreal Engine. In order to set up a melee combat system for both the player and AI I will need to set up a line tracing feature as well as a health variable for both the AI and player, these will be set to the values outlined in the GDD and I will be able to subtract health from these variables when an attack is registered on either the player or AI.
In a simple form, the combat works though the same theory as the collision boxes of the keys and doors, it registers that an actor has entered the collision and then subtracts the equivalent amount of damage from either the player or AI. In addition to this, I will be using my previous knowledge to create an interactive player health bar that will also update following the change in health, however, this is not in the videos I used. When looking at the videos and their effectiveness I feel that these videos were effective at helping me to understand and use the techniques within my game and I am extremely happy with the results of these tutorials, the health systems and Melee systems work flawlessly.In conclusion, I will now add these techniques to my latest build and will configure the combat system to suit the needs of my game.