
Final Major Project:
Interactive Media and Games design 3
Jake Williams
Planning Documents
Game Design Document
A Game Design Document is usually a very large document that contains all of the game's information such as the overall gameplay story, technical aspects and also the theme, genres and mechanics that have been intended to be added to the game. I have created my own GDD at a very stripped back level, this is because I felt that in my research a GDD would not be as beneficial for my project as other planning documents such as the Story Bible and Asset List. Overall, I felt that this document was helpful to carry out and I will definitely reflect back upon this document throughout the development process.
Story Bible
Going from my previous experience with documents like this, I felt that a Story Bible would be an extremely helpful tool to help me plan out a lot of the experiences within the game and also the documentation helped me to plan out my characters in more detail. Overall, this document was very beneficial when it came to planning every aspect of Streets of Shadows and I feel that with reflection upon this document I will be able to create a detailed gameplay experience. Furthermore, I feel that the document was helpful in building the concrete ideas to my game and helped me to collate my ideas into a single document, which allowed me to work out any flaws in the story before I moved on to the development of my game.
Asset List
Before I even started this project I knew that an Asset List would be an important part of the planning phase and that is why I created this document. The Asset List allowed me to go into immense detail about the assets that I intend to develop and include within my horror puzzle game and therefore this document will help me keep track of all of my assets as well as the progress through the creation of my assets. Overall, I felt that an Asset List was an extremely beneficial document that has allowed me to detail all of my assets as well as their purpose within the game, this will help me later on in the development phases to keep track of the assets that I need to create.
Sound Plan
Through previous experiences using a Sound Plan document within my planning I found that it can help significantly when it comes to planning and understanding what audio and sound effects I need to create for my game. This Sound Plan details the audio recording I need, when the sound effect will be played and how I intend to record the sound effect. This document allowed me to go into immense detail about the sound effects and soundtracks that I need and I feel that this document is imperative when it comes to the progression of this project as well as my professional work ethic, this is because I will not need to spend time during the production phases figuring out the audio assets I need because I have already planned them out, therefore I will have more time working on my game. Overall, I feel that working with professional documents helps not only with my project but also with my professional work flow as I am working with professional documents that will likely be used when I move into industry.
Level Blueprints
Level Blueprints are a key feature in any planning phase for a game and so that is why I have included several blueprints in the planning stage for my game, my level blueprints range from level designs to the open world map layout and I feel that these layouts and blueprints show the evolution of my level designs. Overall, the creation of these versions of level blueprints will help me significantly when it comes to laying out my levels in Construct as I have already planned out the basic layout on paper. The first version of my World Blueprint showcases a basic shape and does not incorporate a wide variety of detail. I decided to complete the first version using Piskel because I felt if I was to create a rough pixel art version first then it would make it easier to expand upon the design using pencil and paper. The first version ,which can be seen below, lacks in terrain variety and does not include any of the details such as water or land, I feel that this version needs expanding upon and definitely needs improving. Moving onto my second version, I have opted for a traditional pencil sketch and this has allowed me to expand upon my first version by including details such as land, water, roads, broken bridges and most importantly buildings. I feel that this iteration of my World blueprint will aid me when it comes to creating my world map layout in Construct 3 during production.
 World Blueprint V1 - Pixel: Black Outlines - Road Layout Boxes - Buildings Broken Lines - Broken Bridges Grey Area - Land |  World Blueprint V2: Black Outlines - Road Layout Circles - Buildings Wavy Lines at end of roads - Broken Bridges Green Outline (Inside) - Land Green Outline (Outside) - Water |
|---|
Following on from my World Maps, I started to design three versions of my level blueprints, these level blueprints featured a single level that I intend to add to my game and these blueprints evolve overtime from version to version. Focusing on the first version, I wanted to capture a basic outline of the building interior that would make up the puzzle area and the blueprint did not include many details, I felt it was lacking in detail as I had not incorporated many of the mechanics that I had planned out in my previous planning documents. In the first version we can see that I have included many conventions of puzzle / escape room games and also horror games; these are features that I carried across all of the versions of the blueprint. The second version of the level blueprint featured a larger map and also extra rooms and environmental items throughout the map interior to increase the length of the puzzle level. I incorporated the water mechanics and also inventory mechanics into this version as the player passes a pool of water on spawn and also the player has to pick up several items to unlock doors and storage rooms. Overall, this second version was just a build on from my first version and the main differences between the two were, I now specified the spawn point, planned a larger map and also added many of the mechanics that I had planned. Moving onto my final version of the level blueprint, I created a more well rounded and thought out level design, this version added a second area to my map that would be accessible through a key code entry door followed by stairs. After the player collects the keycode they can then travel down the stairs to encounter several enemies, these enemies enhance the combat mechanic and add the survival element to the game. In addition, the main areas of development from the previous blueprints have been that I now have planned to add extra areas to the maps as well as enhancing the full compatibility and interactivity of the inventory system.
 Level Blueprint - V1 |  Level Blueprint - V2 |  Level Blueprint - V3 |
|---|
Overall, Level Blueprints have been extremely helpful and I feel the second most important planning documents after the Asset List, I feel I now have all of the necessary planning in terms of levels and map design to be able to move smoothly onto experimentation and production.
Concept Art
 Rough Sketch of a building |  Rough Pixel Art of a building |
|---|
Concept Art is another key planning document that really allows me to jot down concept ideas for my character designs, item designs and also environmental designs, Concept art has really helped me to expand upon my ideas and truly visualise them. In addition, my concept art shows how my ideas have evolved from my pencil sketches to rough pixel art designs. This planning is imperative at allowing for development of designs and has really allowed me to get a visual idea of my assets before I then move onto developing the final iterations to my designs.
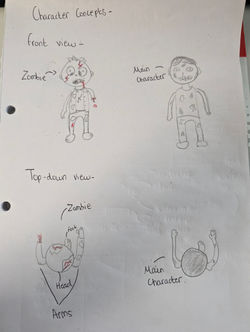 Rough Pencil Sketch of character concepts |  Rough Pixel Art of the zombie enemy |  Rough Pixel Art of main character |
|---|
 Pencil Sketch Concepts of interactable items |
|---|
PERT Chart

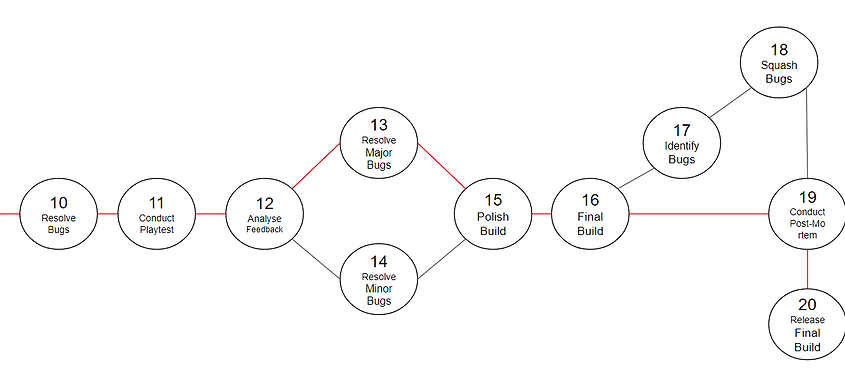
Following on from my contextual research report and also my planning experimentation, I found this method to be helpful but not as effective as the Gantt Chart, nonetheless I have decided to include the PERT Chart into my planning documents because in this project, planning will be extremely important for helping me stay on track and understanding all of the different tasks that I need to complete along the critical path. Overall, the PERT Chart will come in handy as a backup to the Gantt Chart and will help me to understand the critical path of the project which I was unable to add to my Gantt Chart. Unlike my Gantt Chart which is an ongoing planning document, I will not be updating this document as the project progresses as I feel the Gantt Chart will be more beneficial.
Mechanic Planning

Following on from my contextual research report and my experimentation of my planning documents I found this method of planning out mechanics and level progression to be the better method of level planning and so naturally I created this document. The mechanic and level plan essentially features a hierarchy system for the mechanics ranging from core mechanics to secondary mechanics and then events. I then created a timeline diagram showing the event linked with the mechanic and what the mechanic or event would trigger and when. This allowed me to create a basic level plan in terms of gameplay and I feel that this was helpful in allowing me to visualise the events and mechanics within the levels and this will be beneficial when it comes to designing and producing my levels within Construct 3. Overall, I feel that this mechanic plan will help me greatly later in the production stages and I feel that the detail within the documentation will help me to create well planned levels and puzzles.
Gantt Chart
Click on the slideshow to view the high resolution images of my Gantt Chart versions.


The last planning documentation that I created was the Gantt Chart; the Chart has helped me to plan out all of the stages of development and has allowed me to create a timeframe based upon the processes, this will come in handy during several stages throughout the rest of this project and to ensure that I get the most out of this document I will continuously update the Gantt Chart showing my progress through the project and these versions will be displayed on my Wix Site. The first version of the Gantt Chart that I created was very basic and I mentioned in my weekly journals that the document did not go into detail about all of the processes throughout the development of my different game builds, so this version was a very strong start for my documentation and I have expanded upon the document as I progressed through the various tasks featured on the tasks list, and I will continue to update this. Overall, I feel that the Gantt Chart was an extremely useful document and will help me to use my time efficiently, effectively and wisely throughout the remainder of the Final Major Project. In addition, I feel that the Chart will come into its own throughout the development stages of the project because I will be able to check what tasks I have completed, half way through or not completed yet, and this will help me to understand the next tasks that I need to carry out throughout the different stages of the cycle. A live version of the Gantt Chart will be available to view below, whilst previous versions will be available above on a gallery slideshow.