_edited.jpg)
Year 2 IMG
Maya Session 1
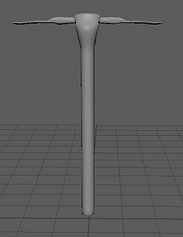
During the first week of the Where Am I ? project I carried out extensive experimentation in both Maya and Unreal Engine, the first Maya experimentation session saw me using image planes to model a vase based on an imported image and also an object of my choosing, adding hair to a head model and too an animal of my choice and finally creating pipes using two different methods. These tasks stretched and tested my Maya knowledge and I believe that this experimentation has been extremely important to the progress of my knowledge and I believe that it will set me up for the 3D modelling required in this project and any projects beyond.
Image Plane - Vase


Image Plane - Pickaxe

Maya - Hair - Head Model


Maya - Fur - Bee Model


Maya - Pipe 1
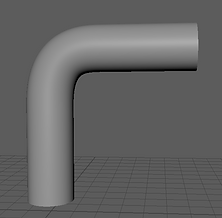

Maya - Pipe 2


Unreal Session 1
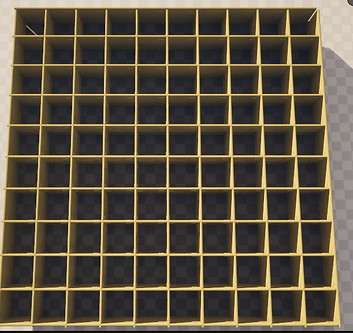
During the first week of the Where Am I ? project I carried out extensive experimentation in both Maya and Unreal Engine, the first Unreal Engine 5 session saw me learning how to use a grid based level template, I used provided assets to create a grid level design for the basis for my experimentation maze. I then saved the grid for use later when I need to create extra levels, this speeds up my development as I can duplicate the template and remove walls to create more levels in the maze.
Also I learnt how to use materials and also how to add wind physics to grass objects. In addition, I added a playable character and also a door and a pick up skull that will be eventually used to open the door. I am pleased with these Unreal Sessions because they provide me with the bedrock for me to build my knowledge off of, for example the code that I used for the pick up skull can be applied to many pick up objects within this project and also in future.
Grid Level design
Materials & Foliage Physics


Player Character - Set-up

Door, Skull and Pedestal - Set-up


Unreal Session 2
Following on from the last Unreal session I carried out a second session looking into how to add functionality to the door and also a portal pad that teleports the player to the next level of the maze. These are all basic mechanics that I will aim to use in my own project outcome and these sessions on the functionality of a door and also a portal have been extremely helpful to the progression of my knowledge and setting me up with the basic theory for me to develop a maze game independently.
Overall, I ran into no issues in these sessions and this due to the fact that I have been keeping notes of the content delivery for me to reflect back upon to aid with the implementation of my code into my Unreal project.
Now when the player collects the skull, they can insert it into the door and the door will run a timeline that will create an animation of the skull entering the door and then the door falling into the ground to reveal a portal to the next level.
Door, Skull and Pedestal - Functionality


Portal - Functionality


User Experience
In randomly selected groups we discussed the many aspects of User Experience and how to incorporate UX into our level design and overall game design, this will allow us to create experiences that follow standard User Experience in order to work on creating experiences that consider these theories to develop a well planned gameplay experience.
The overall theory we discussed was Breadcrumbing, after researching into Breadcrumbing in my past research report I had a brief understanding of what the theory entailed, however in my group we discussed different ways of using Breadcrumbing to guide a player through a game or level.
We came up with the following ideas for using environmental objects to guide a player:
-
Using foliage placement to guide a player or using the positioning of walls to achieve a guide through a game.
-
-
Using varying wall designs to guide a player, for example the closer to the exit the more damaged the wall would be because it would have been passed by many times.
After discussing using environmental objects to guide the player, I decided that I may not use this type of breadcrumbing in my project because I feel that it does not really guide the player compared to other ideas that we came up with.
The next area we looked at within breadcrumbing was the use of lights, we came up with the following:
-
The light of the environment gets lighter as you near the exit of the maze.
-
-
The use of torches, the torches become unlit if walking in an incorrect direction and then reignite when heading in the correct direction.
-
Using cracked walls to showcase light, illuminating the way to the exit through the cracks in the walls.
-
Utilising strobe or flashing lighting to act as a directional guide for the player. This effect will lead the player through the maze level thanks to the directional strobe effect.
After looking at lighting and how it can be used to guide a player, I have analysed the examples and decided that I will possibly use lighting in my project as a way of guiding the character. I will illuminate the exit of the maze or the door to the next level using a particle emitter or spotlight to help the exit stand out to the player against the dark environment.
The next use of breadcrumbing we discussed was colours and their meaning in guiding the player. We came up with several examples and uses for colours in breadcrumbing:
-
Using bright colours for key objects against the dark environments in order to help the player identify key elements of the level.
-
Adding red or orange emissive flares to a game in order to signify urgency and act as a waypoint for the player to reach a goal or objective in the gameplay.
-
We talked about colours and their connotations, we said about using red for dangerous objects or items and green for health pick-ups, different colours can be applied to different connotations.
After brainstorming about colours and their role in breadcrumbing, I have decided that this a very important and prominent type of breadcrumbing so I will apply this theory to my project by utilising colours and applying relevant colours to key objects in order to convey the correct meaning for the use of the object.
The next use of breadcrumbing we discussed was iconography:
-
Using a magnifying glass symbol to signify that an important object is within players reach.
-
Adding a security camera icon to signify that the player has be spotted, this can be closely applied to stealth type games such as Hitman.
After talking about iconography I believe that my idea of using icons for identifying important objects in the game has a really good use at guiding the player, so I will definitely consider this in the future, however not in this project as I want to create a maze so it needs to have a level of challenge for the player.
The last use of breadcrumbing we discussed was landmarks:
-
Using tall buildings to help the player identify their position in the maze or level.
After brainstorming about the use of landmarks, I feel that this could be relevant to my project and I have decided that I will included landmark breadcrumbing in my maze to help the players sense of direction.
Overall, I feel that this group session was a great way of helping build brainstorming skills and it also helped to bring together everybody's ideas so that we could learn more about different applications of the breadcrumbing theory. I feel that this session on UX was extremely important to help build the knowledge of successful UX design and now I will apply this knowledge to this project and every project going forward to ensure that I am working at a higher standard.
-
-
