_edited.jpg)
Year 2 IMG
Problem Solving
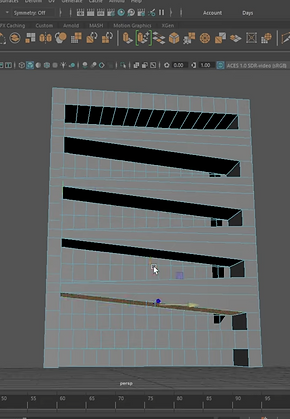
During the process of creating my sideboard I have run into a problem, this problem is that when I go and extrude the face that I want to sculpt into the flat front of the sideboard I am faced with a slanted face that creates an unwanted side that I do not need. I believe that this has come about because I have not extruded the face correctly meaning that instead of adjusting the thickness of the face I am just moving the face upwards creating this slanted face.
I believe that I can fix this in two ways, the first being that I can undo my past extrude actions and use the thickness tool instead or I can start from scratch and use a full cuboid and sculpt the legs, doors and handles from the solid cuboid. This last option will probably be the better choice of the two as I can ensure that my sideboard is perfectly straight, as I will not have full control of the extruded face using the first option.
I managed to fix this issue using the second option that I stated above, I cleared my scene and inserted a cuboid, I then scaled the cuboid to the correct size and then extruded the doors, handles and legs from the cuboid to create a flat sideboard. This was a simple fix and to ensure that small mistakes like this do not arise again I will reflect upon my video logs to improve my workflow.


During the process of creating my bookcase I have run into a problem, this problem is that when I go and extrude the faces for my shelves in the bookcase I am faced with a slanted faces that creates unwanted slanted shelves and also non-flat shelves. I believe that this has come about because I have not extruded the face correctly meaning that instead of adjusting the thickness of the face I am just moving the faces upwards creating these slanted and bulging shelves.
I believe that I can fix this issue by looking back at previous notes and videos that have been provided, I believe that during the creation of the chair I used a Bridge tool to create straight connects between two faces, so I think if I look back at this project session I will be able to find a fix.
I managed to fix this issue by doing exactly as set out, I looked back at my evidence and creation of the chair and found that I in fact did use the Bridge tool to create connections between faces. I deleted all of the incorrect shelves and used the bridge tool to connect the faces to create flat shelves for my bookcase.


During the session of creating my mug asset I have run into a problem, this problem is that when I go and try to create the curved handle I am unable to bend the faces accurately to recreate the curve of the handle. I believe that this has occurred because I am trying to sculpt a curve from a flat face, so instead of creating the intended curve I am faced with many triangles and vertices each pointing in different directions from my handle.
I believe that I can fix this issue by looking back at previous notes and maybe I can use the bridge tool alongside the circular face tool to create circular faces that better represent the handles structure.
I managed to fix this issue by doing exactly as set out, I looked back at my previous notes and used the circular face tool alongside the Bridge tool to create the basis of the handle. From there I changed the number of edge loops, divisions and bend type to create the bend in the handle. This fix took a long time to figure out and I recorded my creation and fix process so that I can reflect back upon it in future if I need to.


During the process of implementing my door mechanic into my experience I have encountered an issue, this issue is that I am unable to correctly open the door fully when colliding with the doors collision box. I believe that I have encountered this issue because I have not correctly adjusted the collisions of the door frame or the walls, or I have not correctly adjusted the lock for the door swing physics.
I believe that I can fix this problem by looking back at my research report and reflecting upon the video source that I used to write and learn about this mechanic, as I have said above I believe that I can adjust the collisions of the walls and also I can look at the physics blocker for the door swing to ensure that I am correctly using the feature. If these fixes do not work I will have to look at the other video that I used in the research report and use the knowledge from that to apply any fixes.
I managed to fix this issue by looking back at my research report and re-watching the video, I found that I had both not correctly adjusted collisions and also not used the physics blocker correctly. I removed collisions from the door frame and also the borders around the wall, this did not resolve the issue, but when I opened up the viewport for the door I looked at the physics blocker and found that it was positioned backwards resulting in the door not being able to open and close, I moved the blocker and adjusted the mass of the door to be lower so the door would be easier to push. By adjusting everything above I was able to successfully recreate the doors in my environment and they now open and close correctly.
During the process of adding lighting to my environment I have ran into a problem, I am unable to see any lighting at all from my ceiling lights in my viewport when I play the experience. I believe that I have encountered this issue whilst implementing lighting because I have decided to use spotlighting on my lights so they only produce a cone of light, like I used for my torch, I think that this has resulted in me being unable to view any light.
I believe that I can resolve this issue by removing the spotlights and using a different light asset, however I have never used any other light source so I will need to experiment with different lighting assets and ensure that I apply the light to the ceiling light blueprint to update all of the light sources automatically instead of applying the light sources manually resulting in inconsistent lighting..
I managed to fix this issue by looking through different lighting assets, like I set out to do and I managed to find an asset called point light, point light allows for more realistic and widespread lighting compared to spotlights and I am now able to see shadows and lighting in my viewport. I also used the blueprints like I said and as a result all of the ceiling lights updated to the new lighting system.


Fix can be seen from 24:00 in the video
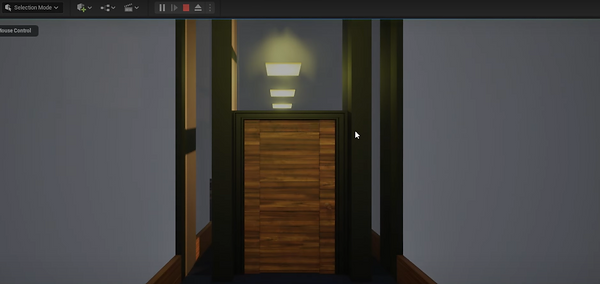
During the process of updating my lighting in my environment following an issue that arose, I have ran into a second problem, I am able to see my updated lighting from my ceiling lights, however my wall, ceiling and flooring assets all reflect light which results in a very bright environment with very unrealistic lighting and shadows. In addition, the assets seem to also emit very faint lighting because I have adjusted the environmental lighting to dark and the assets glow.
I believe that I can resolve this issue by changing the roughness of my materials because I feel that if I do this I will be able to reduce the reflections from the assets resulting in a better lit environment.
I managed to fix this issue by looking through all of my materials and adjusting the roughness, adjusting the roughness did not significantly reduce the reflectiveness, so I looked back through the other variables in the material's and found two strings, specular and emit colour. I reduced the specular value, even though I did not know what the specular adjusted and then set the emit colour to transparent, because I assumed that the emit colour was creating the brighter material. I saved the changes to the materials and opened the project in the viewport. Instantly I noticed a huge difference, the assets looked less reflective and the lighting looked more realistic.


In the images above the lights create an intense reflection across all of the surfaces more so from the floor and ceiling.
