_edited.jpg)
Year 2 IMG
Unreal Session 1
Our first Unreal Session of the project saw me learning how to programme in AI pathfinding, this is something that I had previously looked at independently in the second project, however this time I used a completely different approach I used a Behaviour Tree and also a Blackboard in order for the AI and the Behaviour tree to communicate with each other, this allows for multiple AI in my scene and the Behaviour tree creates a series of executable tasks that are cross referenced with different variables in order to trigger the correct event.
Random Pathfinding AI
This is the behaviour tree created in order for the AI to choose between chase movement and random pathfinding based on whether the player can be seen by the AI


This is code runs the behaviour tree on the start of the level


Player Chase AI

This image shows the code required for the AI to find the player and continue to follow the player if the player is within sight
These are the variables required for the blackboard to communicate with the AI and behaviour tree

AI Pathfinding - Extension Game
As an extension for completing the two required tasks I developed a game that incorporates the AI pathfinding and chase player AI, this game sees the player navigate a maze level whilst running away from an AI NPC, upon impact from the chasing AI the level will restart.

Level Layout
Unreal Session 2
The second Unreal Session that I carried out in the project saw me learning how to programme in Guns, Different types of Guns and firing types and also HUD's. This was all new to me and I believe that this learning will greatly help in my FPS project because I will be needing to programme in Gun pickups and also a HUD system for the game. For this session I used pre-recorded videos given to us by Ryan Laley, this was a new way of working and I believe that this was of learning works better for me as I am able to rewind the video and look at areas that I did not quite understand the first watch. I work better from learning sections at a time so this work method works better for me.
Gun & HUD setup

Arm Setup - Gun Parent
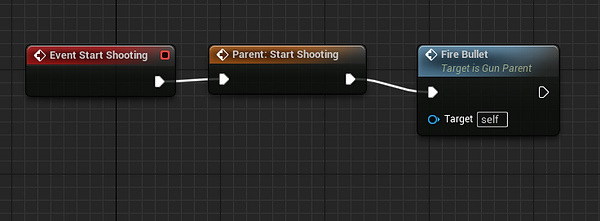
Gun Semi Auto fire setup


HUD - Widget Blueprint
HUD - Crosshair
Gun - full auto fire

Gun full auto fire setup
Maya Session 1
The first Maya session of this FPS project saw me following several videos learning how to rig, skin and animate several objects in Maya. I began with a simple ball animation that required no rigging or skinning, this was completed first in order for me to understand the basics of animation in Maya, I opted for the more challenging task in this first task, I modified the size and stretch of the ball each time it bounced to simulate a realistic bouncing ball.
The second task saw me adding joints to a simple cylinder, I then attached the rig to the skin of the cylinder and created a simple animation using the animation tools. After this, I used an auto rig system to add a human skeletal mesh to a Mario character, I then adjusted the joint locations to reflect the location of real life joints and then created a more complex animation in Maya.
These tasks are extremely important for the development of my Maya skills and animation skills as a whole, in the future I will have to use the animation features in Maya or another software so learning this now will really help me out in this project and also ones in the future.
Following on from this, I used image references to model a lightsaber in Maya, this task was a subtask of this session and it was simply to test our knowledge and ability in Maya.
Ball Animation

Here is the layout of the animation tab in Maya its shows the viewport of my ball and the timeframe below shows the balls movement across the 120 seconds of the animation
Cylinder skinning, rigging & animation

Here is the layout of the rigging and joints UI in Maya, in the centre of the cylinder you can see the joints these are the points in which the model will move and bend
Mario skinning, rigging and animation

Here is the layout of the quick rig UI in Maya, on the Mario model you can see the bones and joints that I have moved to reflect the bone structure of a human

Here is the animation being created in the animation tab you can see that I have moved Mario and he moves from left to right
Maya - Lightsaber sub-task

Here is my finished lightsaber
Here is the reference image I was using

Unreal Session 3
The third Unreal Session that I carried out in the project saw me learning how to create more complex widgets that can be triggered to display an interactive User Interface that can be used to start a new game, continue from a last save and also quit the game. This menu UI will be helpful when it comes to development of my group game because we will be looking at using widgets, UI's and GUI's to display information to the player, such as a start up menu and a GUI for documents. This session ran smoothly and without fault because I had the video tutorial to reflect back upon if I ran into a blockade in my programming.
Menu UI

Menu UI widget design
Camera Code for panning camera into main menu

Personal Experimentation
Experimentation - FPS
Localised Fog:
The first technique that I am going to experiment with in Unreal Engine 5 will be localised fog, I researched into two methods of achieving localised fog in Unreal and I will experiment with both and evaluate the effectiveness of the methods making a decision as to what I want to carry forward into production. I intend to learn this technique in order to add depth, immersion and improve the atmosphere in our horror FPS game. I am hoping to fully understand the technique and be able to effectively add this to my game in order to elevate the horror theme and add more to the atmosphere to the game.
Practical:
Ryan Laley:
BoroCG:
Reflection:
Both of these experimentations ran smoothly, the tutorials were very easy to follow and this was due to my extensive research and previous knowledge with materials in Unreal Engine 5. I was able to complete the two outcomes from these sources and that was thanks to the clear guides given by both sources. My experimentation has opened me to evaluate the effectiveness of both methods and moving forward I will use the Ryan Laley method because this involves me creating the fog material from scratch, allowing me to have greater control over the parameters of the fog material such as colour, density and also opacity. Whereas, the second method came with a pre-made material and the parameters are all set so I will have less control over the look and behaviour of the fog material, so by going from this I will stick with the Ryan Laley method when applying volumetric fog in my FPS game.
Health Systems & Health Pickups:
The second technique that I am going to experiment with in Unreal Engine 5 will be health bar systems and also health item pickups, I researched into two methods of achieving health systems on GUI’s in Unreal and I will experiment with both and evaluate the effectiveness of the methods making a decision as to what I want to carry forward into production. I intend to learn this technique in order to achieve a working and continuously updating health system so that the player will be able to see the health of the main character whilst playing through the game. In addition, I want to be able to include this in my game as it plays a major role in almost every game and most importantly an FPS, this mechanic will allow the player to balance their approach to the Hat Man as they will have to consider there health and the location of health pickups throughout the game.
Practical:
Gorka Games:
Unreal ART With Alireza:
Reflection:
Both of the practical experimentations ran smoothly. I was able to complete these experimentations successfully because of the research report. This allowed me to see an overview of the techniques and the methods needed in order to implement the method into Unreal. In addition, I was able to review the sources used in the research and this helped me to recap any lost information that I did not include in my report. My experimentation has opened me to evaluate the effectiveness of both methods and moving forward I will use the second method supplied by Unreal ART With Alireza, because this was overall a more streamlined and quicker approach to the health system and this method also allows me to add health pick-ups something that I will add in my game to add a level of difficulty. Whereas, the second method was a lot more complicated and less streamlined and did not allow for health pickups so moving forward I will stick with the Unreal ART method.
Unreal Engine
Maya
Booleans:
When it comes to experimenting with Maya techniques I researched into Booleans, from my research I found that Booleans allow me to create more complex edits to my models in order to create more complex 3D models such as curves or objects with cut-outs inlayed into the model. I did plan to research two methods of using these techniques, however, as the techniques can only be carried out in one way I found that a better use of my time would be to expand on my game design research instead. I wanted to experiment with Booleans because I feel that this will make the modelling elements of this project run more smoothly as I will be able to create complex edits and models more easily than before and the experimentation will allow me to understand and get used to the tools before moving into development.
Practical:
Autodesk Article:
Reflection:
On reflection, I found that these Boolean operations were very simple to understand and use, and I believe that I will be able to successfully use these tools when it comes to modelling my assets in Maya. In addition, thanks to the research report I was able to reflect back upon the methods and evaluate the effectiveness of each Boolean Operation in order to come to an educated conclusion, I feel that I will now be able to apply this knowledge to my modelling and hopefully this will allow me to model more complex models and speed up the modelling section of development.
Level Design
When it comes to Level Design experimentation and also game design, I feel that experimentation would not work for the techniques that I researched, however I will apply my learning and research to create a well planned level blueprint, a story structure and also a Game Design Document. I will put these documents down below, but updated versions thereafter will be available from the Planning tab on this projects site.
Level Blueprints

Story Structure


Game Design Document
Blender Session
To kick off the first Blender session I started by learning the basics and applying this to the modelling software. I looked at importing an object, how to move the object and finally how to manipulate an object. After learning the basics, I looked at modelling a donut with as little polygons as possible, I achieved this by using smooth modifiers to keep the same poly structure but smoothing the edges without increasing the polygon count. I found these two tasks to be fairly simple as I have previous knowledge of Blender and this was simply a refresher for me. As an extension I applied textures and shaders to the donut and also added a cloth to the top of the donut as a glaze.
Basics / Donut


UV Session - Maya
After learning the basics and experimenting with shading and textures I moved onto experimenting with UV Mapping in preparation for applying textures to an object. In addition, I managed to successfully create several UV Maps for three objects without fault and I now believe that my skills have improved in Maya and UV Mapping as a whole, I am now prepared for texturing.
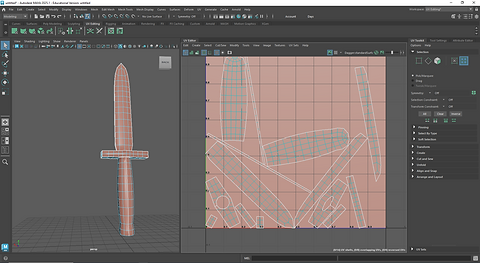
Dagger UV Map

Vase UV Map

Fish UV Map
